Breaking News

Popular News


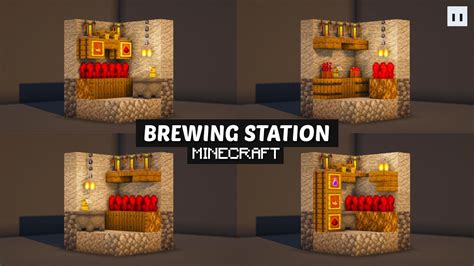
Learn how to set up a home brewing station step-by-step: choosing location, gathering materials, building stand, ingredient storage, and testing. Perfect for beginners!Are you looking to take your Minecraft skills to the next level? If so, creating your own brewing station is a perfect way to do just that. By following these simple steps, you’ll be able to brew your own potions and take your gameplay to new heights. In this blog post, we’ll walk you through the process of creating your own brewing station in Minecraft. From choosing the perfect location to gathering the necessary materials, building the brewing stand, setting up ingredient storage, and finally testing your brewing station, we’ll cover everything you need to know to get started. So, grab your pickaxe and let’s get brewing!
Contents
When creating your own brewing station in Minecraft, one of the first and most important steps is choosing the perfect location for it. You’ll want to find a spot that is easily accessible, but also out of the way enough that it won’t interfere with other activities in your Minecraft world.
Consider looking for a location near your existing base or home, so that you can easily access and utilize your brewing station without having to travel too far. It’s also important to consider the surrounding environment – you’ll want to make sure your brewing station is in an area with plenty of space and a flat surface to work with.
Additionally, take into consideration any aesthetic preferences you may have. Choosing a location that fits the theme of your Minecraft world or base can make your brewing station feel more cohesive and integrated into the overall design.
When creating your own brewing station in Minecraft, it’s important to gather all the necessary materials before you begin. The brewing stand is a key component of the station and requires three cobblestones and a blaze rod. To make the brewing stand look more appealing, you can use a range of materials such as nether bricks, quartz, and blackstone, as well as gold, iron, or copper blocks. Additionally, you will need glass bottles, water, and different ingredients such as nether wart, blaze powder, sugar, spider eye, and more to create a range of potions.
If you plan to automate your brewing station, you may also need to gather materials for redstone mechanisms and hoppers to collect and transport the potions. This can include redstone dust, repeaters, comparators, pistons, and observer blocks. Building a proper storage area for all these materials is also important, so gather plenty of wood and chests to store everything neatly and efficiently. Remember to gather enough fuel such as coal, sticks, or wood to power your brewing station as well.
Before you start your materials gathering journey, it’s crucial to plan out how much of each item you will need and where you can find them in the game. Create a checklist of all the required materials and tick them off as you gather them. Once you have gathered all the necessary materials, you’ll be ready to move on to the next step of building your brewing station in Minecraft.
In Minecraft, one of the most essential components of creating your own brewing station is building the brewing stand. To start this process, you will need to gather the necessary materials such as blaze rods and cobblestones. Once you have acquired these materials, you can begin by opening your crafting table and placing three cobblestones in the bottom row and one blaze rod in the center square to craft your brewing stand.
After crafting the brewing stand, you will need to find the perfect location for it in your base. It’s important to choose a spot that is easily accessible as well as visually appealing. Consider placing it near your ingredient storage area so that everything you need is in close proximity.
Once you have completed the placement of your brewing stand, you can then start experimenting with different brewing recipes to create potions that will aid you in your Minecraft adventures. Whether it’s fire resistance or invisibility, the possibilities are endless with your newly constructed brewing stand.
Creating Your Own Brewing Station in Minecraft
One of the key elements in creating a successful brewing station in Minecraft is setting up proper ingredient storage. Without organized and easily accessible ingredients, your brewing process could become chaotic and inefficient. To ensure smooth operation, follow these steps to set up effective ingredient storage for your brewing station.
First, designate a specific area within your base or brewing station to store all of your brewing ingredients. This area should be easily accessible and preferably near your brewing stand to minimize the time spent fetching ingredients.
Next, create chests or barrels to store your ingredients. Label each storage container with the specific ingredients it holds, such as nether wart, blaze powder, sugar, etc. This will make it easy to locate the necessary ingredients when brewing different potions.
After putting in all the hard work to gather necessary materials, build the brewing stand, and set up ingredient storage, it’s time to test your brewing station in Minecraft. But before you start, make sure that you have everything in place, including water bottles, blaze powder, nether wart, and any other ingredients you might need for your potions.
Once you have all your materials ready, it’s time to start brewing. Use the brewing stand to create different potions and test out the efficiency of your setup. Make sure to keep track of the materials and see if you need to make any adjustments to the brewing process.
Take notes on the time it takes to brew potions, the quantity produced, and the overall performance of your brewing station. This testing phase will help you identify any areas of improvement and ensure that your brewing station is fully functional and optimized for potion-making in Minecraft.
What materials do I need to create a brewing station in Minecraft?
To create a brewing station in Minecraft, you will need a brewing stand, bottles, and ingredients such as Nether wart, blaze powder, and various types of plants or fungi.
Where can I find the necessary materials for a brewing station in Minecraft?
You can find Nether wart in the Nether fortress, blaze powder from blaze mobs, and various plants or fungi from different biomes in Minecraft.
What are the different types of potions I can brew in Minecraft?
You can brew a variety of potions in Minecraft, including potions of healing, potions of invisibility, potions of strength, potions of fire resistance, and many more.
How do I use the brewing stand to create potions in Minecraft?
To use the brewing stand, you need to place it on the ground and interact with it. Then you can add water bottles, the desired ingredients, and use blaze powder as fuel to start the brewing process.
Can I automate the brewing process in Minecraft?
Yes, you can automate the brewing process by using redstone contraptions and water streams to transport the bottles and ingredients to the brewing stand.
Are there any tips for creating an efficient brewing station in Minecraft?
You can optimize your brewing station by organizing your ingredients, setting up an automatic water source, and having a steady supply of blaze powder for fuel.
What are some fun ways to incorporate a brewing station into my Minecraft world?
You can create a themed potion room, build a brewery in a village, or design a secret alchemy lab hidden underground.